개요
ubuntu 18.04 환경에서 개인 프로젝트를 하던 중, Spring Security를 활용한 로그인을 하던 중 http에 https 적용하고 싶었습니다. 실제 운영에서는 https 적용을 위해 한국 전자인증에서 도메인에 맞는 SSL을 구입하여 적용하였습니다.
Cerbot이란?
Cerbot는 무료로 TLS인증서를 발급받을 수 있는 라이브러리로 Let's Encrypt라는 비영리 기관에서 관리됩니다. 루트 도매인, 서브 도매인, 와일드카드 도매인 인증서까지 무료로 발급 받을 수 있습니다.
Apache와 nginx에 TLS/SSL 설정이 자동으로 되어 nginx에 많이 사용됩니다.
시스템 관리자로 웹서버에서 다이렉트로 사용됩니다.
- cerbot 설치하기
//certbot 을 설치 하기 위해 먼저 epel repository 를 등록합니다.
sudo yum -y install epel-release yum-utils

//certbot 및 nginx plugin을 설치합니다.
sudo yum -y install certbot certbot-nginx
공식 홈페이지에서는 아래 사이트에서 snap으로 다운받기를 권장합니다.
왜냐하면 snap은 최신 버전의(예를 들어 자동 인증서 갱신) certbot인지 쉽게 확인할 수 있는 방법을 제공하기 때문입니다.
https://certbot.eff.org/instructions
Certbot Instructions
Tagline
certbot.eff.org
- nginx에 등록된 호스트들 인증서(SSL) 발급받기
nginx에 등록된 호스트 인증서를 발급 받습니다. 아래와 같이 수행하면 certbot이 nginx 의 설정파일을 참조하여 등록된 모든 호스트에 대해서 인증서 발급을 받을 수 있습니다.
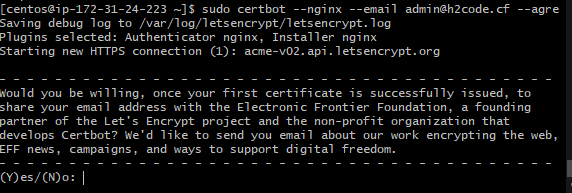
sudo certbot --nginx --email admin@h2code.cf --agree-tos
이메일로 소식을 받을지 물어봅니다. N을 입력해도 됩니다.

혹은 아래와 같이 특정 도메인만 인증서(SSL) 를 발급 받을 수 있습니다.
sudo certbot --nginx -d www.h2code.cf --email admin@h2code.cf --agree-tos
도메인 이름을 입력하라고 합니다. 도메인을 입력하고 엔터(Y)를 칩니다.

HTTPS로 Redirect 설정을 certbot이 대신해줄 것인지 아닌지를 선택합니다. 2번을 선택하면 certbot이 기존의 conf 파일에서 redirect 구문을 추가하고 포트 변경 ,ssl_ciphers,ssl_protocols 정보를 모두 다 설정합니다.
Please choose whether or not to redirect HTTP traffic to HTTPS, removing HTTP access.
- - - - - - - - - - - - - - - - - - - - - - - - - - - - - - - - - - - - - - - -
1: No redirect - Make no further changes to the webserver configuration.
2: Redirect - Make all requests redirect to secure HTTPS access. Choose this for
new sites, or if you're confident your site works on HTTPS. You can undo this
change by editing your web server's configuration.
- - - - - - - - - - - - - - - - - - - - - - - - - - - - - - - - - - - - - - - -
Select the appropriate number [1-2] then [enter] (press 'c' to cancel)
생성이 완료 되었으며 만료 기간은 2021-04-01입니다. 키 파일은 /etc/letsencrypt/live/h2code.cf 아래 위치하고 있다고 알려줍니다. Centos OS와 Ubuntu 경로 모두 동일합니다.
IMPORTANT NOTES:
- Congratulations! Your certificate and chain have been saved at:
/etc/letsencrypt/live/h2code.cf/fullchain.pem
Your key file has been saved at:
/etc/letsencrypt/live/h2code.cf/privkey.pem
Your cert will expire on 2021-04-01. To obtain a new or tweaked
version of this certificate in the future, simply run certbot again
with the "certonly" option. To non-interactively renew *all* of
your certificates, run "certbot renew"
- Your account credentials have been saved in your Certbot
configuration directory at /etc/letsencrypt. You should make a
secure backup of this folder now. This configuration directory will
also contain certificates and private keys obtained by Certbot so
making regular backups of this folder is ideal.
- If you like Certbot, please consider supporting our work by:

Donating to ISRG / Let's Encrypt: https://letsencrypt.org/donate
Donating to EFF: https://eff.org/donate-le
참고
https://hoing.io/archives/11906
https://eff-certbot.readthedocs.io/en/stable/install.html
'문제 해결, 기술 비교 > 개인프로젝트(북클럽)' 카테고리의 다른 글
| Elastic Search 연동 및 테스트하기 (0) | 2022.05.27 |
|---|---|
| RabbitMQ 이용해서 글 작성하기 (0) | 2022.05.27 |
| application.yml 분리하기 (0) | 2022.05.22 |
| jenkins build시, slack 알람 연동하기 (0) | 2022.05.22 |
| centos에 redis 설치하기 (0) | 2022.05.19 |


