임시권한 부여를 확인하기 위해서, SecurityInterceptor의 내부 작동방식을 다시 한번 짚어보고, 임시권한을 추가해야
할 위치를 확인한다.
FilterSecurityInterceptor, MethodSecurityInterceptor 2개의 Interceptor는 각각 invoke 메서드가 작동한다.
public Object invoke(MethodInvocation mi) throws Throwable {
  InterceptorStatusToken token = super.beforeInvocation(mi);
	Object result;
	try {
		result = mi.proceed();
	}
	finally {
			super.finallyInvocation(token);
  }
	return super.afterInvocation(token, result);
}
beforeInvoation이 정상적으로 실행이된다면 finallyInvocation이 진행되게 된다. 그리고 afterInvocation을 처리하는 방식이 일반적이다. AbstractSecurityInterceptor에서 beforeInvoation의 RunAs 체크로직은 pre에서 검사되는 beforeInvocation안에 있다.
protected InterceptorStatusToken beforeInvocation(Object object) {
	...

	// Attempt to run as a different user
	Authentication runAs = this.runAsManager.buildRunAs(authenticated, object, attributes);
	if (runAs != null) {
		SecurityContext origCtx = SecurityContextHolder.getContext();
		SecurityContextHolder.setContext(SecurityContextHolder.createEmptyContext());
		SecurityContextHolder.getContext().setAuthentication(runAs);
		// need to revert to token.Authenticated post-invocation
		return new InterceptorStatusToken(origCtx, true, attributes, object);
	}
	// no further work post-invocation
	return new InterceptorStatusToken(SecurityContextHolder.getContext(), false, attributes, object);

}

protected void finallyInvocation(InterceptorStatusToken token) {
	if (token != null && token.isContextHolderRefreshRequired()) {
		SecurityContextHolder.setContext(token.getSecurityContext());
	}
}
권한통과가 가능하면, 포함되어있는 정보를 기반으로 RunAs Token을 발급하고 넘겨준다. RunAs Token이 있다면 결론적으로 finallyInvocation에서 SecurityContextHolder에 RunAs에 해당하는 Token을 넣는다.
BuildRunAs로 RunAs 토큰이 있는지 검사하는 과정은 다음과 같다.
public class RunAsManagerImpl implements RunAsManager, InitializingBean {

  public Authentication buildRunAs(
		Authentication authentication,
		Object object,
		Collection<ConfigAttribute> attributes
  ) {
		List<GrantedAuthority> newAuthorities = new ArrayList<>();
		for (ConfigAttribute attribute : attributes) {
			if (this.supports(attribute)) {
				GrantedAuthority extraAuthority = new SimpleGrantedAuthority(
						getRolePrefix() + attribute.getAttribute());
				newAuthorities.add(extraAuthority);
			}
		}
		if (newAuthorities.size() == 0) {
			return null;
		}
		// Add existing authorities
		newAuthorities.addAll(authentication.getAuthorities());
		return new RunAsUserToken(this.key, authentication.getPrincipal(), authentication.getCredentials(),
				newAuthorities, authentication.getClass());
	}
}
PREFIX가 RUNAS라면 맨 앞에 ROLE_을 추가해서 새로운 토큰을 만들어서 리턴한다.
*프로젝트 실습
@EnableGlobalMethodSecurity(prePostEnabled = true, securedEnabled = true)
public class MethodSecurityConfiguration extends GlobalMethodSecurityConfiguration {
.....
    @Override
    protected RunAsManager runAsManager() {
        RunAsManagerImpl runas = new RunAsManagerImpl();
        runas.setKey("runas");
        return runas;
    }
RunAsManager를 재정의해서 "runas" key값을 가지도록 한다.
@Secured({"ROLE_USER", "RUN_AS_PRIMARY"})
@GetMapping("/allpapers")
public List<Paper> allPapers(@AuthenticationPrincipal User user) {
  return paperService.getAllPapers();
}
allPapers() 메서드를 실행하면 "ROLE_USER" 권한이 있기 때문에 진입이 가능하며, @Secured에 있는 RUN_AS_PRIMARY 권한을 준다.
@Secured({"ROLE_PRIMARY", "ROLE_RUN_AS_PRIMARY"})
public List<Paper> getAllPapers() {
  return paperDB.values().stream().collect(Collectors.toList());
}
마찬가지로 ROLE_RUN_AS_PRIMARY 임시권한을 부여할 수 있다.
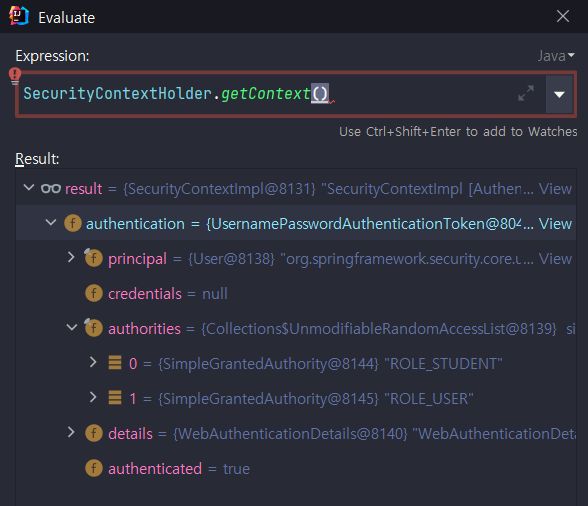
RunAs를 통과하기 이전에는 ROLE_STUDENT, ROLE_USER를 가진다.

Authentication runAs = this.runAsManager.buildRunAs(authenticated, object, attributes);

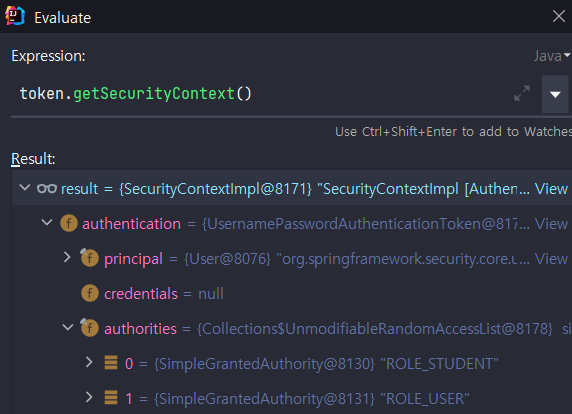
runAsManager의 buildRunAs를 통과하고 나서 runAs 토큰을 확인하면, ROLE_RUN_AS_PRIMARY가 추가되어 3가지의 권한을 가지게 된다.
finallyInvocation()과 afterInvocation()에서는 어떻게 될까? MethodSecurityInterceptor.class에서 살펴보자
public void invoke(FilterInvocation filterInvocation) throws IOException, ServletException {
	if (isApplied(filterInvocation) && this.observeOncePerRequest) {
		// filter already applied to this request and user wants us to observe
		// once-per-request handling, so don't re-do security checking
		filterInvocation.getChain().doFilter(filterInvocation.getRequest(), filterInvocation.getResponse());
		return;
	}
	// first time this request being called, so perform security checking
	if (filterInvocation.getRequest() != null && this.observeOncePerRequest) {
		filterInvocation.getRequest().setAttribute(FILTER_APPLIED, Boolean.TRUE);
	}
	InterceptorStatusToken token = super.beforeInvocation(filterInvocation);
	try {
		filterInvocation.getChain().doFilter(filterInvocation.getRequest(), filterInvocation.getResponse());
	}
	finally {
		super.finallyInvocation(token);
	}
	super.afterInvocation(token, null);
}
finallyInvocation에서는 authorities가 3개이지만, Controller가 작동하는 afterInvocation에서는 2개이다.


임시권한을 부여하기 위해서 MethodSecurityInterceptor를 구체적으로 살펴보았다. @Secured의 후속 강의로서, 해당 어노테이션을 이용해 임시권한을 줄 수 있다. 주목할 것은, GlobalMethodSecurityConfiguration을 상속한 클래스에서 RunAsManager를 재정의 해야한다는 것, buildRunAs에서 PREFIX를 검사해서 RunAs를 검사하고 해당 토큰을 추가한다는 것, 이 과정이 Filter와 Method에서 둘다 관여하는 invoke 함수 안에서 beforeInvocation에서 검사가 된다는 것을 알 수 있다.
'Spring > Spring Security' 카테고리의 다른 글
| AuthToken 사용하기 (0) | 2021.10.26 |
|---|---|
| JWT 토큰 (0) | 2021.10.26 |
| @Secured 기반 권한체크 (0) | 2021.10.20 |
| 메서드 후처리 (0) | 2021.10.19 |
| 권한위원회 voter (0) | 2021.10.17 |


