*사용하는 경우
- SPA페이지(react, vue...)
- 브라우저 기반의 모바일 앱(브라우저 기반의 앱, ex:inoic)
public class SecurityConfig extends WebSecurityConfigurerAdapter {

  @Override
  protected void configure(HttpSecurity http) throws Exception {
      http
              .httpBasic();
  }
}
* BasicAuthenticationFilter 흐름

* 동작 방식
1. GET 방식으로 /greeting을 요청했을 때, headers에 Authorization에 토큰을 Basic으로 보낸다.
2. client의 요청이DispatcherServlet으로 가기 전에 필터에서 request를 가로채서 검사 후에, 인증이 성공하면 SecurityContextHolder에 인증토큰을 넣어준다.
3. 원래 목적지 target으로 이동한다.
최초 로그인에는 BasicAuthentication 인증으로 처리하고 이후에는 session으로 검증한다. session의 장점은 처음 로그인 시에 인증이 완료되면 계속 토큰을 보내주지 않아도 된다는 것이다. session을 이용하거나, Remember Me를 브라우저에 저장하고 로그인 페이지를 거치지 않고 이용할 때 BasicAuthentication을 사용한다.
* 주의점
1. Basic은 인코딩을 하지만(base64) 보안을 위한 방식은 아니다. header를 decode하면 바로 정보를 확인할 수 있기 때문이다. 그래서 https 프로토콜을 꼭 사용하여 보안을 유지한다.
2. 에러가 나면 401(UnAuthorized) 에러를 보낸다
* 대안점
매번 요청시마다 headers에 Basic 토큰을 보내는 것은 보안에 취약하기 때문에 실무에서는 Bearer 토큰을 통해 비밀번호를 노출시키지 않고 보낸다. session을 사용할 때만 Basic 토큰 방식을 이용한다.
Bearer 토큰의 경우, 초기 인증을 하면 서버에서 로그인한 계정의 최소한의 정보를 담고 있는 토큰 정보를 발급한다. 로그인 한 회원은 요청을 할때마다 발급된 토큰을 함께 보내서 인증을 한다. 이 때 토큰의 해석하여 어떤 사용자이고, 어떤 권한을 가지고 있는지 확인한다.
* 시큐리티 필터 설정하기
@EnableWebSecurity
public class SecurityConfig extends WebSecurityConfigurerAdapter  {
    @Override
    protected void configure(AuthenticationManagerBuilder auth) throws Exception {
        auth.inMemoryAuthentication()
                .withUser(
                        User.withDefaultPasswordEncoder()
                                .username("user1")
                                .password("1111")
                                .roles("USER")
                                .build()
                );
    }

    @Override
    protected void configure(HttpSecurity http) throws Exception {
        http
                .authorizeRequests().anyRequest().authenticated()
                .and()
                .httpBasic();
    }
}
AuthenticationManagerBuilder의 configure로 인메모리방식의 user1 계정을 생성한다.
HttpSecurity의 configure로 2가지 설정을 한다.
1. 로그인 시에는 어떤 요청(anyRequest())도 인증을 완료(authenticated())해야 한다.
2. BasicAuthentication 인증방식을 사용하기 위해 httpBasic()을 사용한다.
* BasicAuthentication 인증 테스트
    @Test
    void test2() {
        HttpHeaders headers = new HttpHeaders();
        headers.add(HttpHeaders.AUTHORIZATION, "Basic " + Base64.getEncoder().encodeToString(
                "user1:1111".getBytes()
        ));
        HttpEntity entity = new HttpEntity(null, headers);
        ResponseEntity<String> response = client
                .exchange(greetingUrl(), HttpMethod.GET, entity, String.class);

        assertEquals("hello", response.getBody());
    }
BasicAuthentication을 사용하기 위해서 직접 headers를 만드는 테스트이다.
headers.add(HttpHeaders.AUTHORIZATION, "Basic " + Base64.getEncoder().encodeToString(
                "user1:1111".getBytes()
        ));
headers에 "user:1111"으로 Basic 토큰을 만든다. 해당 AUTHORIZATION으로 로그인을 시도하면 정상적으로 로그인이 된다.
* BaiscAuthentcation 동작방식 코드로 확인하기
BasicAuthentication 토큰이 만들어지는 과정은 BasicAuthenticationFilter의 doFilterInternal에서 확인한다.
@Override
protected void doFilterInternal(HttpServletRequest request, HttpServletResponse response, FilterChain chain)
throws IOException, ServletException {
try {
    UsernamePasswordAuthenticationToken authRequest = this.authenticationConverter.convert(request);
if (authRequest == null) {
UsernamePasswordAuthenticationToken authRequest = this.authenticationConverter.convert(request); 라인의 convert 메서드에서 토큰 만드는 과정을 확인할 수 있다.
        @Override
        public UsernamePasswordAuthenticationToken convert(HttpServletRequest request) {
		String header = request.getHeader(HttpHeaders.AUTHORIZATION); //AUTHORIZATION 확인
		if (header == null) {
			return null;
		}
		header = header.trim(); //trim으로 공백 제거
		if (!StringUtils.startsWithIgnoreCase(header, AUTHENTICATION_SCHEME_BASIC)) {
			return null;
		}
		if (header.equalsIgnoreCase(AUTHENTICATION_SCHEME_BASIC)) {
			throw new BadCredentialsException("Empty basic authentication token");
        }

        //Basic 뒤의 base64인코딩된 문자열만 획득
        byte[] base64Token = header.substring(6).getBytes(StandardCharsets.UTF_8);

        //획득한 문자열 decode
        byte[] decoded = decode(base64Token);

        //decode 된 바이트 문자열에서 token 정보 획득
        String token = new String(decoded, getCredentialsCharset(request));
		int delim = token.indexOf(":");
		if (delim == -1) {
			throw new BadCredentialsException("Invalid basic authentication token");
        }

        //획득한 token을 UsernamePasswordAuthenticationToken에 넣기
        UsernamePasswordAuthenticationToken result =
        new UsernamePasswordAuthenticationToken(token.substring(0, delim), token.substring(delim + 1));

        //details에 토큰 삽입
        result.setDetails(this.authenticationDetailsSource.buildDetails(request));
		return result;
	}
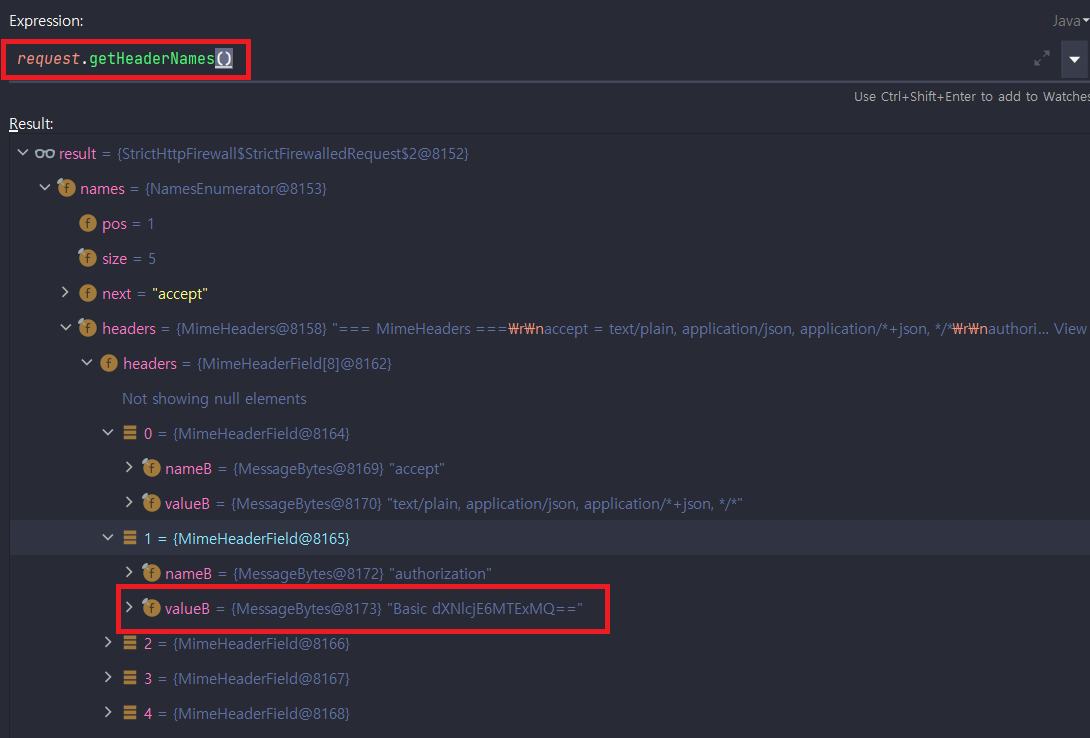
convert 메서드는 AUTHORIZAION으로 요청 온 header에서 Basic 뒤에 붙은 bas64 토큰을 잘라 decode한 이후, 남은 정보들로 UsernamePasswordAuthenticationToken을 만들어서 details에 넣고 리턴한다.

빨간 네모 박스의 "Basic dXNIcjE6MTExMQ==" 가 아이디, 비밀번호의 문자열이 base64로 인코딩 된 부분이다.
@Override
protected void doFilterInternal(HttpServletRequest request, HttpServletResponse response, FilterChain chain)
  throws IOException, ServletException {
try {
  UsernamePasswordAuthenticationToken authRequest = this.authenticationConverter.convert(request);
  if (authRequest == null) {
    this.logger.trace("Did not process authentication request since failed to find "
    + "username and password in Basic Authorization header");
    chain.doFilter(request, response);
    return;
  }
  String username = authRequest.getName();
  this.logger.trace(LogMessage.format("Found username '%s' in Basic Authorization header", username));
  if (authenticationIsRequired(username)) {
    Authentication authResult = this.authenticationManager.authenticate(authRequest);
    SecurityContextHolder.getContext().setAuthentication(authResult);
    if (this.logger.isDebugEnabled()) {
      this.logger.debug(LogMessage.format("Set SecurityContextHolder to %s", authResult));
    }
    this.rememberMeServices.loginSuccess(request, response, authResult);
    onSuccessfulAuthentication(request, response, authResult);
  }
}
convert 메서드가 끝나고 정상적으로 details를 리턴하여 받은 authRequest는 다음 과정으로 넘어간다. 특히 BasicAuthentication의 경우 if(authenticationIsRequired(username))으로 인증이 되었는지 여부를 판단하여 인증을 안했다면 제공자(AuthenticationProvider)에게 전달되어 인증과정을 거친다. 인증이 완료되면 SecurityContextHolder에 넣어주고 onSuccessfulAuthentication으로 넘어간다.
* 로그인 테스트1
    @GetMapping("/greeting")
    public String greeting() {
        return "hello";
    }
    @Test
    void test3() {
        TestRestTemplate testClient = new TestRestTemplate("user1", "1111");
        String response = testClient.getForObject(greetingUrl(), String.class);
        assertEquals("hello", response);
    }
get방식의 요청은 성공한다.
*로그인 테스트2
    @PostMapping("/greeting")
    public String greeting(@RequestBody String name) {
        return "hello " + name;
    }
    @Test
    void test4() {
        TestRestTemplate testClient = new TestRestTemplate("user1", "1111");
        ResponseEntity<String> response = testClient.postForEntity(greetingUrl(), "jongwon", String.class);
        assertEquals("hello jongwon", response.getBody());
    }
post방식의 요청은 실패한다. post 요청에는 csrf 필터가 작동하고 있기 때문에 해당 필터를 끄고 해야 테스트가 성공한다.
 http
                .csrf().disable()
csrf()를 disable()하여 테스트를 성공했지만, 웹 서비스를 코딩하는 경우 csrf() 기능을 제공해야 한다. 이럴 때, 상이하는 정책이 있을 경우 어떻게 csrf() 필터 정책을 설정해야 할까?
* 선생님 계정으로 로그인 했을 떄, 반 학생들을 조회하는 방법
어디 클래스에서 학생들을 조회할 수 있는 메서드를 정의해야 할까? 학생 계정 정보인 studentDB가 StudentManager 클래스에 있기 때문에 StudentManger를 이용해서 조회할 수 있도록 메서드를 만든다.
    public List<Student> myStudentList(String teacherId) {
        return studentDB.values().stream().filter(s-> s.getTeacherId().equals(teacherId))
                .collect(Collectors.toList());
    }
Student와 Teacher가 연관관계로 있으며, teacherId를 가지고 있는 학생들을 리스트로 조회하는 메서드를 추가한다.
    @PreAuthorize("hasAnyAuthority('ROLE_TEACHER')")
    @GetMapping("/main")
    public String main(@AuthenticationPrincipal Teacher teacher, Model model) {
        model.addAttribute("studentList", studentManager.myStudentList(teacher.getId()));
        return "TeacherMain";
    }
로그인 시 @AuthenticationPrincipal Teacher 정보를 이용해 StudentManager의 myStudentList로 조회한다.
'Spring > Spring Security' 카테고리의 다른 글
| UserDetailsService (0) | 2021.10.11 |
|---|---|
| BaiscToken으로 웹/모바일 로그인 인증 구현하기 (0) | 2021.10.11 |
| authentication 메커니즘 (0) | 2021.10.08 |
| basic login 과정 (0) | 2021.10.08 |
| 간단한 로그인 페이지 만들기 (0) | 2021.10.07 |


